
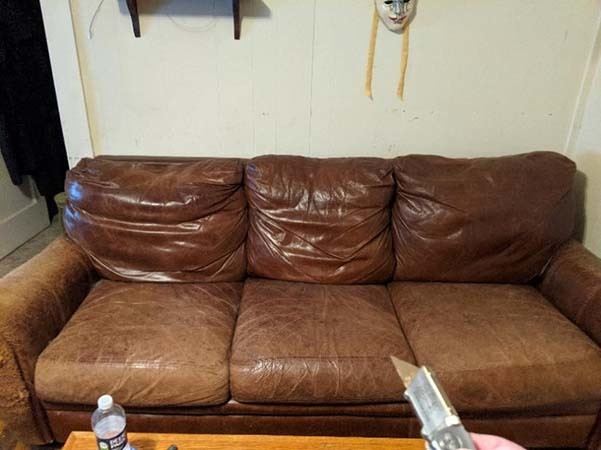
When I first moved to my little rented farmhouse on top of a windswept mountain in rural Virginia, money was tight, and I didn’t own a stick of furniture. To that end, I spent most of my furniture budget on a decent bed and faked the rest.
I got my sofa from the local Goodwill for forty bucks. It was big, heavy, not very comfortable, and honestly, kinda fugly. Still, it was what I could afford, and it solved an immediate problem.
Fast-forward five years. My business has grown, and the lean times are mostly behind me. I’m saving for a place of my own and starting the process of “lightening the load” by getting rid of anything I don’t plan to take with me when I get my own place.
Sure, I could have called the waste management company and arranged for them to get the old sofa, but I’m a huge fan of recycling and upcycling, and I figured I could reclaim some wood from the sofa and turn it into something else later.
With that idea in mind, I planned the Great Sofa Murder of 2020.
In this blog post, I’ll outline exactly how I demolished the sofa, tell you what I learned, and what I got for my troubles. If you plan on doing something similar, this piece will help you avoid making some basic mistakes and hopefully get more material out of the equation.
Overall, I completed the ‘how to take apart a couch project’ in three days, dedicating 1-3 hours in the evening after my regular day’s work.
Tools
The tools I used were:
The only tool on the list that’s not strictly necessary is the Sawzall. Nonetheless, if you don’t use a power saw, the process will take significantly more time.
How to Take Apart a Couch | Day 1
The first thing I did was to remove the sofa cushions and bag them. The sofa cushions are conventional block foam. They’re quite old and beginning to sag in places, so I wasn’t interested in trying to do anything with them.
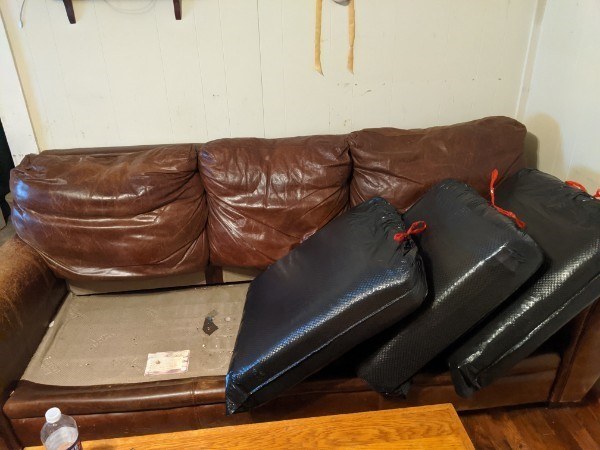
Here’s where I made my first mistake. I just stuffed them in bags, one cushion per bag.
Unfortunately, it didn’t occur to me until later that I could salvage the upholstery on the top portion of each cushion. It’s just taking a straight edge and cutting a nice, neat, even square, then bagging the rest.
Since I didn’t do that initially, I had to spend time untying garbage bags, pulling them out, and cutting out what I wanted.
✔️ SALVAGE: 3 Decent Squares of Upholstery
With that out of the way, it was time to make the first cuts. Arbitrarily, I decided to tackle the back of the sofa first and get rid of the seatback cushions.
I was expecting to find these filled with poly fiberfill that I’d have to take out by the handful and stuff into a couple of garbage bags. That’s not what I found. Each seatback cushion was enclosed in what amounts to a pillowcase sewn shut on all four sides. Sweet.
That made things simple, but here’s where I made my second rookie mistake. It didn’t occur to me until later that night that I could recycle these pillows, cover them with pretty much anything, and have a trio of nice throws. They were still in great shape, after all! So, more unbagging and repacking.

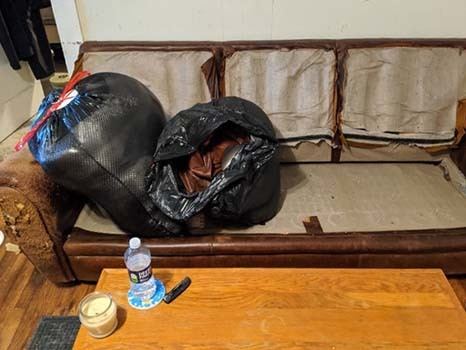
✔️ SALVAGE: 3 Large Throw Pillows
Once the truly simple stuff was attended to, I turned my attention to one of the sofa arms. Having never taken a piece of furniture apart before, I really didn’t know what to expect. Here’s the first thing you should know about how to take apart a couch to throw away: It’s mostly cheap wood, staples, glue, and…there’s actually a lot of cardboard.
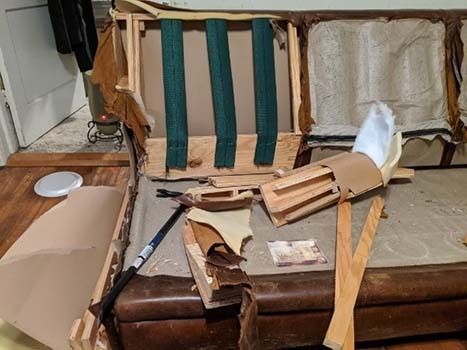
The wood provides the basic shape of the arms, but the cardboard stretched over it gives them their smooth, pretty shape.
That was disappointing and underwhelming to me, but whatever. I’m not really sure what I was expecting. Still, I certainly wasn’t expecting cardboard (cardboard already removed in this photo, but it was wrapped over the top to provide a nice smooth surface: Cardboard, a thin layer of poly fiberfill, and a thin layer of block foam.
It took over an hour, and I had to break out the crowbar, but the sofa arm was defeated in the end!
As you can see, I salvaged a couple of slats (lying on the sofa on the right side of the picture) that I might be able to use for something else later.
And no, that’s not a baby Dalek in the background by the door with his glowing red eye. I’m doing this demo in mid-January, and it’s super cold. The heater is keeping the room tolerably warm!
Oh, and you’ll notice that I removed the fabric from the back of one of the seatback positions. Can you believe how simple the back suspension is? It’s three lengths of stretchy nylon cord. Imagine a bungee cord cut down its length and opened up. That’s basically what those green things are.
✔️ SALVAGE: 2 Wood Slats
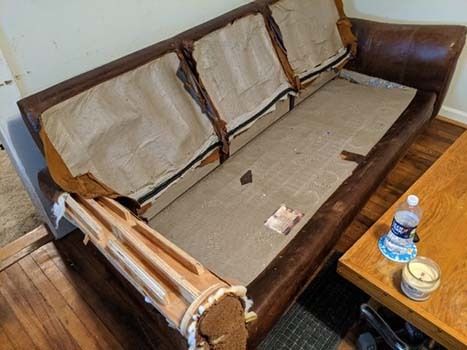
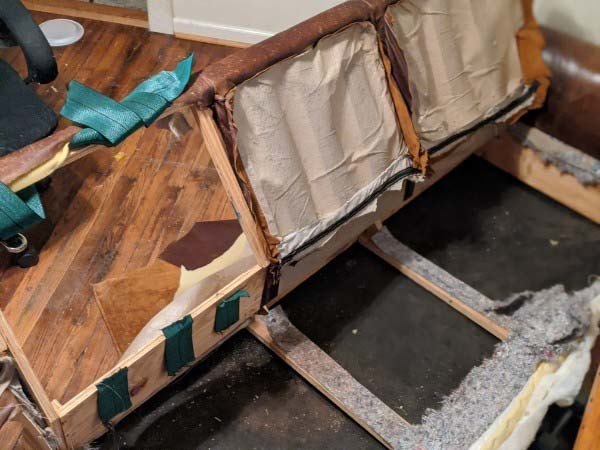
The final bit of fun for the first day was to strip off the fabric covering the sofa’s suspension system so I could see what it was and how it was attached to the frame. Here’s what I found:

This is basically a smaller version of what you find inside a box spring mattress.
It’s attached to the frame at the front and back of the sofa by about 18 screws. I can reach the ones in the front, but to get to the ones in the back, I will need to remove the upholstery (and the cardboard I’m now sure is there) from the back. That, however, will be tomorrow’s project.
How to Take Apart a Couch to Throw Away| Day 2
After a full day’s work, my first goal for the second day was to remove the suspension system from the bottom of the sofa.
To that end, the first thing I did was break out the Phillips screwdriver and unscrew the screws holding the suspension system to the front of the sofa. That process took a looooong time because all the screws were stripped and rusted. I was going to save them, but honestly, they just weren’t worth it.
Once that was done, I cut the back of the sofa upholstery off with the utility knife. Cutting at the stitched seams, I got three good (large) squares of upholstery.

This revealed my third rookie mistake. The next time I dismantle a piece of furniture, I’m going to START by breaking out my first aid kit and keeping it close at hand. Accidents and injuries are inevitable, so it just pays to be prepared for them.
Of course, there was cardboard behind the upholstery, so I cut that out. I received my first of three injuries when I grabbed a section of cardboard containing one of about ten thousand staples. Ouch.
After breaking out the first aid kit, I washed the thumb puncture, slapped a band-aid on it, and continued on with the work.
With the back off, I could get to the other set of screws holding the suspension system in place. As with the set in the front, the screws sucked and were rusted and stripped. It took way longer than it should have, but in the end, I prevailed and removed the suspension system from the sofa.
I have no idea what I will do with it, but it’s in good shape, and it seems a shame to throw it away. It might make a good suspension for a little rolling cot or something. Don’t know, but I’ll keep it. Anyway, here’s the sofa without the suspension.
Now it feels like we’re making some real progress!
Unfortunately (or maybe fortunately), I got a big new freelancing assignment later in the evening of day two. I had to pick up the pace to work it into the schedule. On day three, I planned to bring the Sawzall and hurry things along. The tradeoff would be that I probably wouldn’t get as much salvaged wood out of the deal, but that felt like a pretty good trade.
How to Break Down A Couch for Disposal | Day 3
The first thing I did on day three of my project on how to break down a couch for disposal was to cut the two slats out of the bottom of the sofa. Those were easy cuts, and I put those in the “keep for later” pile.
✔️ SALVAGE: 2 Wood Slats
That done, I kept on with the Sawzall and demolished the back of the sofa, which took about ten minutes. If I hadn’t been in such a hurry, I could have probably saved three more wooden slats from the back, but there’s a catch: All three are riddled with staples and finishing nails. Keeping them would have involved two days’ worth of work with needle-nose pliers and pulling random staples out of the wood. It just wasn’t worth it to me, and I no longer had the time.
So, I cut, cut, and then I spent the better part of an hour bagging sofa guts under the watchful eye of the Cheetah Cat Scratching post hanging on the front door. (The pink towel is my “blood towel.” I received injury #2 while bagging the sofa guts from the back of the sofa. The only piece of wood I saved was the one little board lying on top of the pile you see pictured below.
✔️ SALVAGE: 1 Small Board

The next step was to attack the other sofa arm. I already knew what to expect, so there was no exploration this time—just hacking and smashing.
I took the time to pull out two more wooden slats that were serving as support beams inside the arm of the sofa, but otherwise, just crowbarred the hell out of it and then sawed the arm off of the frame, snipping the upholstery with a pair of scissors to free it.
This left me with what amounted to an oversized raised bed. If I already had my own place, I probably would have stopped here and used it for that very purpose after stripping the rest of the upholstery off.
Unfortunately, I’m still renting and have nowhere to put it. I started by breaking out the hammer and hammering on the stubby ends of the sofa to free the large plank of wood running along the back. That only took about five minutes, and I had the biggest and best haul of the entire project.
Once that was done, I cut both of the “stubby ends” in half to make them short enough to fit into garbage bags easily. Note that you have to cut at least two inches from the corner to avoid staples and finishing nails, and it takes a surprisingly long time to cut through the wood, but in the end, it wasn’t too bad.
The next bit was simple and involved gravity and brute force. I folded the short end attached to the front of the sofa and wrenched it free.
This pic shows what was left after doing the first and before starting on the second. As you can see, we’re just about done here:

The final step was dealing with the dreadful front of the sofa base. This was a tough customer because it had lots of upholstery on it, and two boards were nailed together. Cutting through it with my little Sawzall would have been a lesson in frustration, and stripping all the upholstery and staples out to preserve the wood would have taken days, so I just resolved to ditch the entire front piece.
I broke out the crowbar to see if I could pry the two pieces of wood apart, but it wasn’t happening. Maybe if I’d had more and better equipment or a separate pair of hands, I could have forced it, but there’s no guarantee that the wood would have been intact. I regard it as just not being worth the trouble, so…
I took the final piece outside to my brick steps, stomped on it until it started cracking, and then broke it off with brute force. I did that twice, and I had pieces short enough to bag.
After that, the only thing left to do was vacuum up the last of the debris and give the floor a final sweep, and suddenly, I had all sorts of space in my living room!


My final haul was half a dozen good upholstery squares I’m planning to wrap my cat trees in, three good, big throw pillows, and five good pieces of wood I can use to build something else down the road. Oh, and the suspension system. I don’t know what to do with that, but it’s in good shape.
I also found 36 cents (a quarter, a dime, and a penny) in the sofa, along with two petrified gummy bears and a clothespin, but I don’t really consider those valuable.
Final Thoughts
I learned a LOT from this project on how to take apart a couch, and if I hadn’t had to hurry toward the end, I could have gotten a few more pieces of wood out of the deal.
Honestly, though, there’s more wood to be had by breaking apart shipping pallets, and they’re a lot faster and easier to do. Still, this was a good project and highly educational. If you’re after more than just wood, buying a sofa on the cheap and reclaiming the throws, the suspension system, and upholstery squares is a good move. Depending on what you have planned for those things, it could well be worth your time.